Sunday, December 22, 2013

Christmas Nail Art


Christmas is almost here and if you're looking for a last-minute Christmassy manicure, you've come to the right place. I've come up with 6 designs that would be great for any Christmas parties or other festivities.

RUDOLPH NAILS:


I started with a brown base and used a black nail striper and a large dotting tool dipped in red polish for Rudolph's face and antlers.


SNOWFLAKE NAILS:


I painted all my nails red and used my smallest dotting tool to make small white "snowflakes" on all but my ring finger. On my ring finger, I used a white nail striper to draw a big, detailed snowflake.


CANDY CANE NAILS:


After painting a white base, I used red and green nail stripers to paint a pattern of one thick and two thin lines on each of my nails, making it look like a candy cane.

ORNAMENT NAILS:


I started this manicure with a pearly white base, but you can use any light-colored base you want. Then I used a red nail striper to paint a large circle towards the tip of each nail. I then used a black nail striper for each ornament's hook. The stripe on the ornaments was done with a dark green striper.

CHRISTMAS LIGHT NAILS:
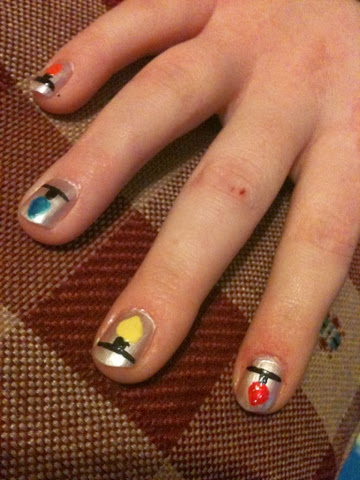

This is one of my favorite manicures of this series. I, again, used a pearlized base and then used a black nail striper to paint the wire and screw-on things of the lightbulbs. I used some bright colors for the bulbs themselves. Another good idea would be alternating red and green bulbs.

PRESENT NAILS:


Though the picture doesn't quite show it justice, the base color is a dark green. For the accent nail, I used a gold nail striper to draw a criss-crossed ribbon with a bow. This manicure can easily be changed up with all sorts of colors like red, silver, blue, and white.


*** and if you noticed some of the hands don't look like mine, it's because I did some of the manicures on my sisters ***

----------------------------------

I hope each and every one of you have a very merry Christmas and I'll be back soon with a NEW YEAR'S manicure.

Sunday, December 8, 2013

Product Rave


Recently I've started using a Suave product that is limited edition for the holidays. It's a body wash in the scent "Peppermint Bliss" and it smells SO good! It has a silky/pearly look to it which is really cool, yet really odd that I like that... Anyways, I've used Suave products for a long time and they're all good quality for drug store products, which means they're a good deal, too! I totally suggest picking up this scent while you can, because as I said it's limited edition! Hope you like it as much as I do!

Friday, November 22, 2013

The Hunger Games: Catching Fire Nails

In celebration of the premiere of Catching Fire, I did a Hunger Games inspired manicure. It's a really simple design, but I will admit the accent nail was pretty difficult. But don't let that discourage you from trying it out!

Step 1:

Paint all your nails with a dark red / maroon polish (I used Wet n Wild megalast Haze of Love) and paint your accent nail black.


Step 2:

Use a gold nail striper to draw flames on the maroon nails, coming from the tips of your nails.


Step 3:

Brace yourself. Here's the hardest part of the manicure. On the black accent nail, use the same gold nail striper to freehand the notorious Mockingjay pin from the movies. It's a little tricky but just stick with it and don't worry about having to retry it a couple times. It'll be worth it.


Step 4:

For added detail, use a black nail striper to make smaller flames inside the gold flames on your thumb. I think this step adds a cool and interesting effect to the manicure and makes it all blend together better.


I hope you enjoy doing this manicure and...

 MAY THE ODDS BE EVER IN YOUR FAVOR.

Friday, November 8, 2013

Pastel Polka Dot Manicure

I did this design a couple weeks ago and am really excited to try it out with all sorts of different colors!
It's a simple design that you can make really versatile. Just use any colors you'd like and apply with a variety of different sized dotting tools.
Have fun with it!

Sunday, October 6, 2013

7 Fall Nail Art Tutorials


••••••••••••••••••••••••••••

FRANKENSTEIN:


Step 1:

Paint 1 coat of white polish on all your nails. (This is to have the neon polish, that will be applied next, be nice and bright)

Step 2:

Paint 1-2 coats of neon green polish on top of the white polish.

Step 3:

Use nail stripers and dotting tools to make the face and hair of Frankenstein on your accent nail, I used my ring finger as my accent nail. Then use silver polish on a dotting tool to make little ovals on either side to represent, I guess they're nails... I don't really know. 

Step 4:

On the rest of your nails, use a black nail striper to make little scars with stitches.

SPIDERWEBS:


Step 1:

Paint all your nails with a coat of white polish.

Step 2:

Paint all but your ring finger nail with a coat of neon orange polish.

Step 3:

Use a white nail striper to draw 3 scallops in the corner of each orange nail.

Step 4:

Use a black nail striper to create a spider web pattern on each scalloped section and on your white accent nail.

CANDY CORN:


Step 1:

Paint each nail with a yellow polish. (Some polishes might need a coat of white under it to make it stand out. Mine did but I skipped that step for time sakes.)

Step 2:

Paint the top 2/3 of each nail with a bright orange polish. 

Step 3:

Paint the top 1/3 with white polish.

Step 4:

For extra definition outline the entire nail using a black nail striper. 

PUMPKINS:


Step 1:

Paint each nail with a fall-y taupe-y brown polish. 

Step 2:

Use a white polish to make a pumpkin shape at the base of each nail, towards the cuticle.

Step 3:

Cover up the white section with a bright orange polish. 

Step 4:

Use a small bit of green polish to make the stem of a pumpkin. 

Step 5:

Use a black nail striper to outline and draw lines inside the pumpkin.

HALLOWEEN POLKA DOTS:


Step 1:

Paint your nails orange, with a black accent nail.

Step 2:

Put either orange and white or black and white (depending on the base color) polka dots on the side of each nail. 

Tip: Make the dots on the black nail white before you make them orange in order to have them show up. 

This is definitively my favorite manicure of them all because it's so simple and so cute. 

FALL LEAVES:


Step 1:

Paint all your nails with brown polish. 

Step 2:

Use a black nail striper to draw a thick stripe on your ring finger nail to represent a tree stump. 

Step 3:

Use a dotting tool dipped in white polish to make tons on white polka dots concentrated towards the tips of your nails and at the top and bottom of your tree stump. 

Step 4:

Use the same dotting tool dipped in any polish that reminds you of fall leaves and cover the white dots. I left some uncovered to brighten the manicure up. 

TRICK-or-TREAT:


Step 1:

Paint all but your ring finger nail with two coats of white polish. 

Step 2:

Use a large dotting tool dipped in different bright colors to make candies on the white nails.

Step 3:

On the accent nail, paint the top 2/3 of the nail with a brown polish.

Step 4:

Use a black nail striper to outline the brown section - giving it a jagged edge, a handle, and a "T/T" standing for "Trick or Treat."

Step 5:

Use a small dotting tool dipped in black polish to make small dots around the candies on the white nails to incorporate the black from the accent nail.

And that concludes my fall nail art tutorials I hope you enjoy trying them out for yourself. Let me know which tutorial is your favorite and comment pictures of your recreations in the comments! I'd love to see them. :)